Showing posts with label GNS3. Show all posts

Thursday, 9 January 2014

Configuring NAT Overload On A Cisco Router

Introduction

NAT (Network Address Translation) is a method that allows the translation (modification) of IP addresses while packets/datagrams are traversing the network. NAT Overload, also known as PAT (Port Address Translation) is essentially NAT with the added feature of TCP/UDP ports translation.
The main purpose of NAT is to hide the IP address (usually private) of a client in order to reserve the public address space. For example a complete network with 100 hosts can have 100 private IP addresses and still be visible to the outside world (internet) as a single IP address. Other benefits of NAT include security and economical usage of the IP address ranges at hand.
The following steps explain basic Cisco router NAT Overload configuration. NAT overload is the most common operation in most businesses around the world, as it enables the whole network to access the Internet using one single real IP address. If you would like to know more about the NAT theory, be sure to read our popular NAT articles, which explain in great depth the NAT functions and applications in today's networks.

Example Scenario

The diagram below represents our example network which consists of a number of internal clients and a router connected to our ISP via its serial interface. The company has been assigned the following Class C subnet: 200.2.2.0/30 (255.255.255.252).
This translates to one usable real IP address - 200.2.2.1 - configured on our router's serial interface. IP address 200.2.2.2 will be used on the other end, that is, the ISP's router. Our ISP has also provided us with the necessary default gateway IP address (configured on our router - not shown) in order to route all traffic to the Internet.
Our goal in this example is to configure NAT Overload (PAT) and provide all internal workstations with Internet access using one public IP address (200.2.2.1).


Configure NAT Overload - PAT (Port Address Translation)

'Overloading' means that the single public IP assigned to your router can be used by multiple internal hosts concurrently. This is done by translating source UDP/TCP ports in the packets and keeping track of them within the translation table kept in the router (R1 in our case). This is a typical NAT configuration for almost all of today's networks.
In addition, NAT Overload (PAT) is covered in great depth on Firewall.cx, please click here to read more.
tk-cisco-routers-nat-ovld-1
The first step in any NAT configuration is to define the inside and outside interfaces. It is imperative that we define the these interfaces for NAT overload to function.
Set the fast ethernet 0/0 interface as the inside interface:
R1# configure terminal
R1(config)# interface fastethernet0/0
R1(config-if)# ip nat inside

Next step is to set the serial interface S0/0 as the outside interface:
R1(config-if)# interface serial0/0
R1(config-if)# ip nat outside
R1(config-if)# exit

We now need to create an Access Control List (ACL) that will include local (private) hosts or network(s). This ACL will later on be applied to the NAT service command, effectively controlling the hosts that will be able to access the Internet. You can use standard or extended access lists depending on your requirements:
R1(config)# access-list 100 remark == [Control NAT Service]==
R1(config)# access-list 100 permit ip 192.168.0.0 0.0.0.255 any
The above command instructs the router to allow the 192.168.0.0/24 network to reach any destination. Note that Cisco router standard and extended ACLs always use wildcards (0.0.0.255).
All that's left now is to enable NAT overload and bind it to the outside interface previously selected:
R1(config)# ip nat inside source list 100 interface serial 0/0 overload
From this point onward, the router will happily create all the necessary translations to allow the 192.168.0.0/24 network access to the Internet.

Verifying NAT Overload operation

Viewing the NAT translation table can sometimes reveal a lot of important information on your network's activity. Here you'll be able to identify traffic that's not supposed to be routed to the Internet or traffic that seems suspicious.
As packets start traversing the router it will gradually build up its NAT/PAT translation table as shown below:
R1# show ip nat translations
Pro Inside global           Inside local            Outside local         Outside global
udp 200.2.2.1:53427  192.168.0.6:53427      74.200.84.4:53        74.200.84.4:53
udp 200.2.2.1:53427  192.168.0.6:53427      195.170.0.1:53        195.170.0.1:53
tcp 200.2.2.1:53638   192.168.0.6:53638      64.233.189.99:80    64.233.189.99:80
tcp 200.2.2.1:57585   192.168.0.7:57585      69.65.106.48:110    69.65.106.48:110
tcp 200.2.2.1:57586   192.168.0.7:57586      69.65.106.48:110    69.65.106.48:110

As shown, the first 2 translations directed to 74.200.84.4 & 195.170.0.1 are DNS requests from internal host 192.168.0.6. The third entry seems to be an http request to a web server with IP address 64.233.189.99.
Looking at the fourth and fifth translation entry, you should identify them as pop3 requests to an external server, possibly generated by an email client.
Because these entries are all dynamically created, they are temporary and will be removed from the translation table after some time.
Another point you might want to keep in mind is that when we use programs that create a lot of connections e.g Utorrent, Limewire, etc., you might see sluggish performance from the router as it tries to keep up with all connections. Having thousands of connections running through the router can put some serious stress on the CPU.
In these cases, we might need to clear the IP NAT table completely to free up resources.
This is easily done using the following command:
R1# clear ip nat translation * 
Assuming no request has been sent right after the command was entered, the NAT translation table should be empty:
R1# show ip nat translations
Pro Inside global ...........Inside local .....Outside local .......Outside global
Lastly, you can obtain statistics on the overload NAT service. This will show you the amount of current translations tracked by our NAT table, plus a lot more:
R1# show ip nat statistics
Total active translations: 200 (0 static, 200 dynamic; 200 extended)
Outside interfaces:
Serial 0/0
Inside interfaces:
FastEthernet0/0
Hits: 163134904 Misses: 0
CEF Translated packets: 161396861, CEF Punted packets: 3465356
Expired translations: 2453616
Dynamic mappings:
-- Inside Source
[Id: 2] access-list 100 interface serial 0/0 refcount 195
Appl doors: 0
Normal doors: 0
Queued Packets: 0

Article Summary

In this article we've covered configuration of NAT Overload on Cisco routers. We also saw how you can control the NAT Overload service using ACLs and obtain detailed statistics on the NAT service. The configuration and commands presented here is compatible with all Cisco router models and IOS's.
If you have found the article useful, we would really appreciate you sharing it with others by using the provided services on the top left corner of this article. Sharing our articles takes only a minute of your time and helps Firewall.cx reach more people through such services.

Sunday, 29 December 2013

Step By Step Guide To Install JunOS on GNS3 [Part 1]

This article explain you how to emulate Juniper JunOS on a PC using Qemu. This is an updated and enhanced
version of excellent howtos from Juniper Clue and Internetwork Pro as well asHimawan Nugroho’s blog. I mainly focused on Qemu, so if you wish to install JunOS on a real PC or using VMware, please have a look at the Juniper Clue article for more information (and of course Google).
So what’s new you would say? First, I chose to use the latest version of Qemu: the 0.11.0 which supports the Intel e1000 network card emulation since version 0.10.0. and includes several fixes for it. I have modified and adapted the old patch for Qemu 0.11.0, it includes the UDP tunnel (connection to dynamips/GNS3), PCAP and LCAP support. Also, the patch allows multicast traffic with the e1000, i82557b and i82559er Qemu emulated network cards.


Moreover, this article show how to emulate JunOS on multiple operating systems: Mac OS X, Windows XP and Linux Ubuntu 9.04 without using an untrustworthy obscure binary downloaded from a forum you can’t even read the language.
 
Disclaimer
Please note that JunOS is not provided and will not be. So please don’t ask. Also, I do not take any responsibility on what happen on your PC, keep in mind this howto requires some patience and that is not for complete beginners. Moreover, this howto doesn’t necessarily present the best and/or easiest way to emulate JunOS. This is the cleanest and less intrusive for me but please feel free to give me constructive comments and tell what worked or didn’t worked for you.


Installation
Requirements
· JunOS runs on top of
FreeBSD. So you need to download the mini installation ISO, version >= 4.5 because earlier versions don’t support the Intel e1000 interface (em driver). Personally, I used the FreeBSD 4.11 mini-inst ISO but you could use FreeBSD 6 or 7.
· JunOS itself. If you are smart and patient you will find it. I used jinstall-8.5R1.14-domestic-signed.tgz for my installations.
· Qemu source code. Again, I used
Qemu 0.11.0. You can choose to download it later with wget (I’ll show you how).
· Download
OpenVPN to create TAP interfaces (Windows only, optional).
· More stuff whether you compile Qemu on Mac OS X, Windows or Linux.

Qemu compilation and patching on Mac OS X

The following procedure has been tested on Mac OS X Snow Leopard.
First you have to
install the MacPorts and its dependencies (e.g. latest Apple’s Xcode Developer Tools).
Open a terminal window and install zlib, wget and libpcap via the MacPorts:


sudo port install zlib wget libpcap 

Unzip qemu somewhere (e.g. in Documents/JunOS). Then from the qemu directory, patch and compile qemu:
Because FreeBSD hanged a few times when I was installing it inside Qemu, I applied a patch (qemu-0.11.0-macosx) which apparently fixed the problem (this is totally optional, maybe you won’t have any issue if not applied).

wget http://download.savannah.gnu.org/releases/qemu/qemu-0.11.0.tar.gz
tar xvzf qemu-0.11.0.tar.gz
cd qemu-0.11.0

wget http://downloads.sourceforge.net/gns-3/qemu-0.11.0-macosx.patch?download
patch -p1 -i qemu-0.11.0-macosx.patch wget http://downloads.sourceforge.net/gns-3/qemu-0.11.0-olive.patch?download

patch -p1 -i qemu-0.11.0-olive.patch
./configure --disable-aio --disable-kvm --disable-kqemu --disable-sdl \
--target-list=i386-softmmu

make
sudo make install


Qemu compilation and patching on Windows
If you do not want to compile Qemu on Windows (I can understand that I provide a static version that you can download here.
First some dependencies must be installed, I chose to almost compile everything:

· Download
MinGW and install it (choose custom installation with g++ and make included). The file I downloaded was MinGW-5.1.6.exe
· Download MSYS and install it, answer yes to post-installation questions and put the correct path to MinGW directory (should be C:\MinGW). The file I downloaded was MSYS-1.0.11.exe.
· Download ,
zlib, SDL, MSYS coreutils into your MSYS home directory (e.g. c:\Msys\public\username). I downloaded zlib-1.2.3.tar.gz, SDL-1.2.14.tar.gz and coreutils-5.97-MSYS-1.0.11-snapshot.tar.bz2. MSYS coreutils is necessary because Qemu signrom.sh uses tools such as dd, od, expr, cp and printf which are included in coreutils.
· Download and install
Winpcap Developer Pack: extract the contents of \lib and \include folders into \lib and \include folders of your MinGW installation location (should be C:\MinGW\lib and C:\MinGW\include)
· Start MSYS.
· Compile and install zlib:

cd
tar -xzvf zlib-1.2.3.tar.gz
cd zlib-1.2.3

./configure --prefix=/mingw
make
make install


Compile and install SDL
tar -xzvf SDL-1.2.14.tar.gz
cd SDL-1.2.14
./configure --prefix=/mingw

make
make install


· Install coreutils

tar -xvjf coreutils-5.97-MSYS-1.0.11-snapshot.tar.bz2


Copy the content of coreutils-5.97-MSYS-1.0.11-snapshot in the MinGW directory (e.g. C:\MinGW). You can also compile and install
wget in MSYS or simply use your preferred browser to download Qemu and the patch in the correct directories.

wget http://download.savannah.gnu.org/releases/qemu/qemu-0.11.0.tar.gz
tar -xvzf qemu-0.11.0.tar.gz
cd qemu-0.11.0

wget http://downloads.sourceforge.net/gns-3/qemu-0.11.0-olive.patch?download
patch -p1 -i qemu-0.11.0-olive.patch
./configure --target-list=i386-softmmu

make
make install


Qemu compilation and patching on Linux

Compiling Qemu on Linux (Ubuntu) is quite simple.First install the dependencies: ncurses, zlib, libpcap-dev and SDL libraries. SDL is optional, you can still use Qemu in a console with the –ncurses option. Then apply the patch and compile Qemu.

sudo apt-get install libncurses5-dev zlib1g-dev libsdl-dev libpcap-dev

wget http://download.savannah.gnu.org/releases/qemu/qemu-0.11.0.tar.gz
tar xvzf qemu-0.11.0.tar.gz
cd qemu-0.11.0

wget http://downloads.sourceforge.net/gns-3/qemu-0.11.0-olive.patch?download
patch -p1 -i qemu-0.11.0-olive.patch
./configure --target-list=i386-softmmu

make
sudo make install

Qemu acceleration
Qemu provides some ways to speed up the emulation, I’ll talk about 2 of them: Kqemu and KVM. Kqemu can be used on both Windows and Linux. KVM is only for Linux. I do not know if something exists for Mac OS X.
For more details about Kqemu, please have a look at the
documentation. For KVM, see thewebsite.
The installation of Kqemu on Windows is relatively easy:

1. Download
Kqemu.
2. Unzip it.
3. Locate kqemu.inf and install it (right-click and select Install). In Windows Vista, install Kqemu using the CMD prompt and this command: rundll32.exe setupapi,InstallHinfSection DefaultInstall 132 kqemu.inf
4. Start Kqemu from the CMD prompt: net start kqemu

Kqemu on Linux (Ubuntu):
1. Install kqemu with: sudo apt-get install kqemu-source
2. If you do not want to use sudo each time you start Qemu, give the permissions to /dev/qemu with the following command:


sudo chmod o+rw /dev/kqemu

For manual installation or other Linux distributions, please see the documentation.

KVM on Linux:

Qemu requires your kernel version to be >= 2.6.29 to enable the KVM support. You have to ensure this is ok before you compile Qemu.
Don’t forget to add the -kernel-kqemu or -enable-kvm command line options when starting Qemu (I didn’t do it in this tutorial). I would recommend to activate Kqemu only when you have your Olive image ready and working.

Step By Step Guide To Install JUNOS on GNS3 [Part 2]

FreeBSD installation
Now that we have qemu installed, we can create the image for installing FreeBSD. Run this command to create it and allocate 4 GB:

qemu-img create -f qcow2 olive-base.img 4G
Launch Qemu to install FreeBSD on the image:


qemu -m 256 -hda olive-base.img -cdrom 4.11-RELEASE-i386-miniinst.iso \
-boot d -localtime


Qemu window will pop up (remember, by default press CTRL + ALT to release the cursor in Qemu):

 
Skip Kernel configuration:

Once Qemu has booted the FreeBSD installation image, you can select standard installation:

When you see the FDISK Partition Editor, press A to allocate the entire disk for FreeBSD and then Q to confirm:
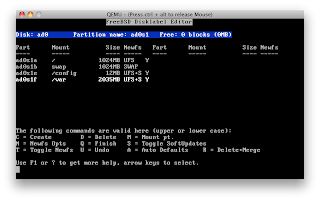
Select “install a standard MBR” and when you see the FreeBSD Disklabel editor, press C to create the following partitions:

ad0s1a / 1024M
ad0s1b swap 1024M
ad0s1e /config 12M
ad0s1f /var rest


Choose “User” distribution type and answer no for the question “Would you like to install the FreeBSD ports collection?”. Exit the menu and install from a FreeBSD CD/DVD: 
Wait until all the files are installed in your image:
Once the files are copied, the installer program will ask you many user confirmation questions (Ethernet/SLIP config, gateway, inetd, FTP, NFS, security, console, linux compatibility, set time, etc). Just answer no for each of them. You will also be asked to enter a root password, just do and remember it. Now you should see the starting menu of the FreeBSD installer, exit by choosing X Exit Install. While FreeBSD CD is rebooting, quit Qemu by by pressing Ctrl-Alt-2, then type: quit.

JunOS installation

Now it’s time to install JunOS our FreeBSD image. I used JunOS 8.5R1.14 but your are free to try other versions even if it is usually recommended to have a version less than 8.5. Boot the image and attach a Intel e1000 virtual network card to Qemu:

qemu -m 256 -hda olive-base.img -boot c -localtime \
-net nic,macaddr=00:aa:00:60:01:01,model=e1000 -net user


FreeBSD should start and after login with the root password, you are ready to enter commands:


Ensure you get an IP address and find out what is your default gateway IP address. Ping it just to be sure it’s working:

dhclient em0
netstat -r
ping 10.0.2.2

You can use FTP or SCP (or any other way you may think about) to download JunOS in FreeBSD. Here I chose to use SCP. On Mac OS X, don’t forget to activate “Remote login” in System Preferences -> Sharing.

scp user@10.0.2.2:~/Desktop/jinstall-8.5R1.14-domestic-signed.tgz /var/tmp

The jinstall file after 7.4 version has a binary called checkpic. This binary will fail and the image cannot be installed. Replacing this binary with /usr/bin/true fixes the issue. Also, it is needed to recalculate MD5 and SHA1 checksums before archiving them back. Finally, you can install JunOS with pkg_add.

cd /var/tmp
mkdir jinst-signed
cd jinst-signed
tar zxvf ../jinstall-8.5R1.14-domestic-signed.tgz

mkdir jinst
cd jinst
tar zxvf ../jinstall-8.5R1.14-domestic.tgz

mkdir pkgtools
cd pkgtools
tar zxvf ../pkgtools.tgz
cd bin
cp /usr/bin/true ./checkpic
cd ..
tar zcvf ../pkgtools.tgz *
cd ..
rm -rf pkgtools
md5 -q jinstall-8.5R1.14-domestic-signed.tgz >


jinstall-8.5R1.14-domestic-signed.tgz.md5
openssh sha1 jinstall-8.5R1.14-domestic-signed.tgz >
jinstall-8.5R1.14-domestic-signed.tgz.sha1

tar zcfv /var/tmp/jinstall-8.5R1.14-domestic-olive.tgz *

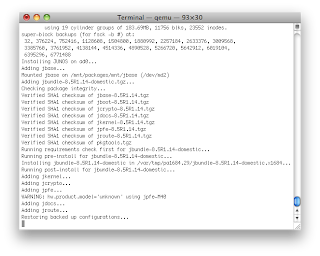
pkg_add -f /var/tmp/jinstall-8.5R1.14-domestic-olive.tgz

Once the jinstall package installed, you can stop FreeBSD by using the halt command and then Qemu by pressing Ctrl-Alt-2, then type: quit. The jinstall above really just installed a bootstrap environment so you need to boot up FreeBSD one more time to finish the installation (depending on your version). If you just restarted your guest above you will notice that you will get no output on your screen. This is because a real Juniper router has no VGA out and redirects everything to the serial port. No worries for us since QEMU will redirect the serial port to either stdio or a telnet port. To do so, launch Qemu with the stdio parameter:

qemu -m 256 -hda olive-base.img -boot c -localtime -nographic -serial stdio

On Mac OS X -nographic is not understand, so just ignore the Qemu window and look at your terminal.
Wait while the bootstrap process completes. The virtual olive will reboot itself automatically and nothing is needed. At the end of this process we will be sitting at a login prompt. Login as root and issue the halt command (CTRL + L if you do not see the prompt) and kill your Qemu proccess.


On Mac OS X, my terminal was kind of “broken”. To fix this, issue the reset command in your terminal.

GNS3 Installation Hypervisor Load Balancing - 2

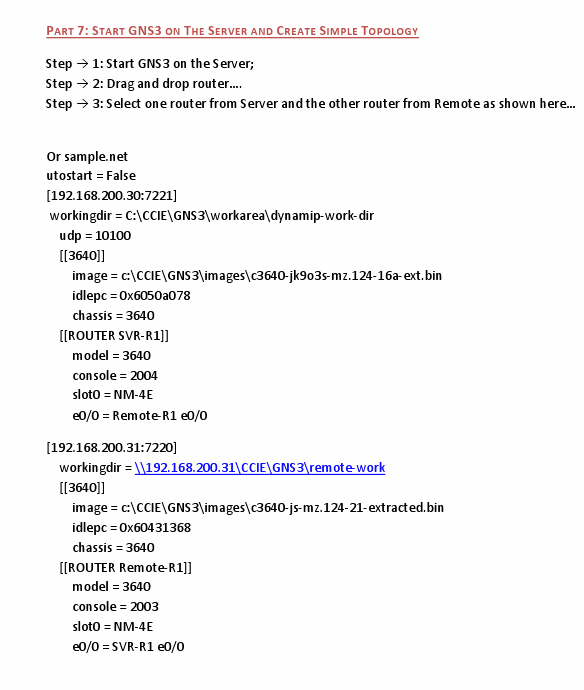
PART 7: START GNS3 ON THE SERVER AND CREATE SIMPLE TOPOLOGY


GNS3 Installation Hypervisor Load Balancing - 1

THIS PROCEDURE MADE UP WITHIN MULTIPLE PARTS:

1. Directory structure 2. GNS3 configurations
3. Configure Hypervisor
4. Edit Dynamips on the client
5. Edit Dynamips on the Server
6. Start Dynamips on SVR and Client
7. Start GNS3 and create simple topology


PART 1: DIRECTORY STRUCTURES
Step 1: Directory to work with… etc.

let’s create some directories in the server, remote PC and call it “GNS3”
Server: C:\GNS3 and remote pc(s): C:\GNS3
Step 2: Image directory… etc.
Server: C:\GNS3\images\ and remote pc(s): C:\GNS3\images\
Copy all the images you are planning use to both directories
Step 3: Folder for “work area” … etc.
Server: C:\GNS3\workarea\ and remote pc(s): C:\GNS3\workarea\
Step 4: Folder for router initial configurations… etc.
Server: C:\GNS3\inital_config\ and remote pc(s): C:\GNS3\inital_config\
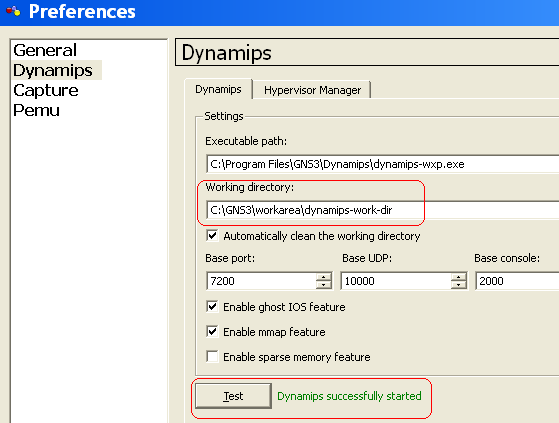
Step 5: Folder for Dynamips work area… etc.
Server: C:\GNS3\workarea\dynamips-work-dir\ and remote pc(s): C:\GNS3\workarea\dynamips-work-dir\
Step 6: Folder for your project directory… etc.
Server: C:\GNS3\workarea\project-dir\ and remote pc(s): C:\GNS3\workarea\project-dir\
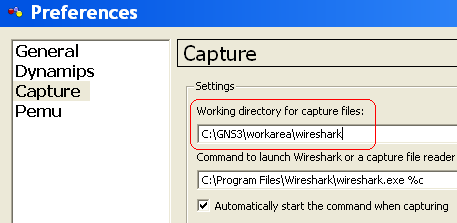
Step 7: Folder for capture directory… etc.
Server: C:\GNS3\workarea\wireshark\ and remote pc(s): C:\GNS3\workarea\wireshark\
Your directory should look like this or what is best works for you…


PART 2: CONFIGURE GNS3
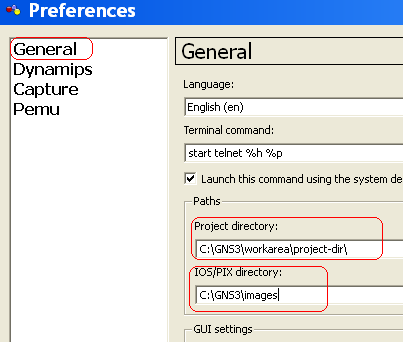
Step 1: Configure Preferences General… etc.
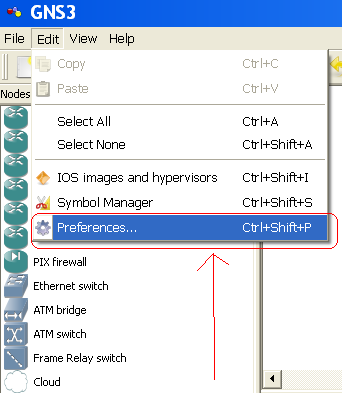
Select  -- >   Edit -->   Preferences


Select--> General, fill out the required fields apply, OK


Step 2: Configure Preferences Dynamips; fill out the required fields, test, apply and OK.


 Step 3: Configure Preferences Capture; fill out the required fields apply, OK.


Step 4: Configure hypervisor…… etc.
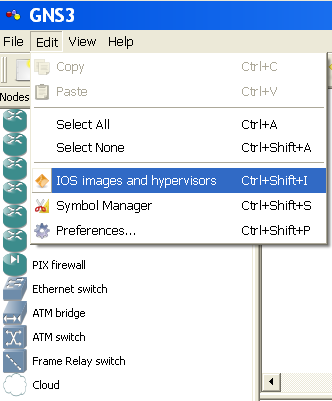
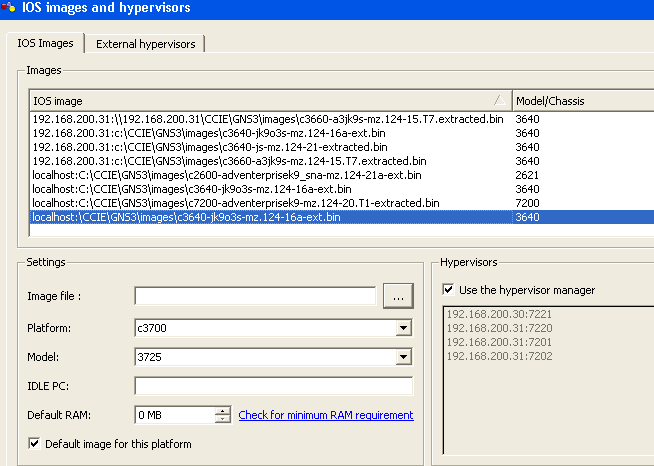
Select; Edit IOS images and hypervisor


Select the image file, platform, model and uncheck default image… box and leave rest default, apply, OK.


PART 3: CONFIGURE HYPERVISOR
Step 1: Configure hypervisor… etc.
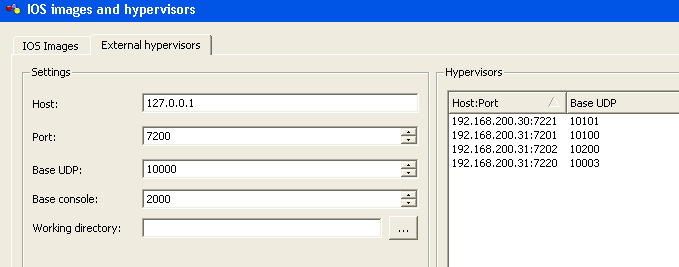
Select; Edit IOS images and hypervisor and click on “External Hypervisor” tab
Host: Your remote PC, to add more host, simply follow same steps, change IP, Port, UDP and console port
Note: XP SP2 or SP3 users; either turn of your firewall or create exceptions for dynamips and ports!
Select; Start Control Panel Windows Firewall; click on Exception tab. Click on “Add Program” for dynamips and
click on “Add Port”
After filling out rest of the fields, click on “save” and click on “IOS Images” tab


PART 4: EDIT DYNAMIPS FILE ON THE CLIENT

Step 1: Remote or login the remote PC and Start Run type “C:\Program Files\GNS3\”
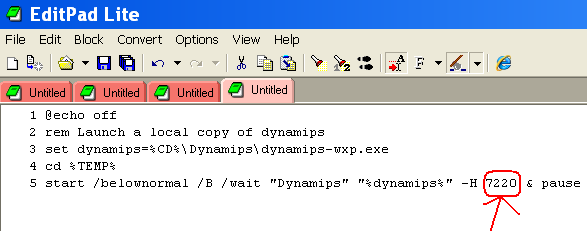
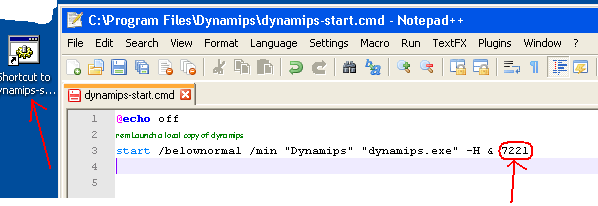
Find “dynamips-start.cmd” edit with your favorite editor;
Change line five where it says 7200 to 7220

Recommend creating a shortcut for “dynamips-start.cmd” to on your desktop, because your going to use this quite frequently because everything
stop the router, you need to shutdown and restart it 


PART 5: EDIT DYNAMIPS FILE ON SERVER


Step 1: Remote or login the remote PC and Start Run type “C:\Program Files\GNS3\”

Find “dynamips-start.cmd” edit with your favorite editor;
Change line five where it says 7200 to 7221


PART 6: START DYNAMIPS ON SERVER AND CLIENT
Server:

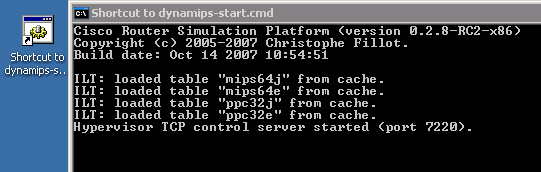
Step 1--> Double on dynamips shortcut on the server’s desktop;
Clients:
Step 2 --> Double on dynamips shortcut on the remote PC’s desktop


Friday, 22 February 2013

Juniper JNCIA-Junos - Class of Service

For this last chapter, you are going to mark some traffic.

Exercise – Marking packets

Your goal is to create a filter that you will apply on JUNOS1′s em4 interface (input). This filter will mark all packets from 10.3.3.0/24 with expedited-forwarding (EF) DSCP.

Solution

firewall {
   family inet {
        filter apply-cos {
            term from-JUNOS3 {
                from {
                    source-address {
                        10.3.3.0/24;
                    }
                }
                then {
                    forwarding-class expedited-forwarding;
                    accept;
                }
            }
            term default {
                then accept;
            }
        }
    }
em4 {
     unit 0 {
         family inet {
             filter {
                 input apply-cos;
             }
             address 172.30.25.9/30;
         }
     }
 }
This is the end of our hands-on exercises, you should now be ready to seat for the
JNCIA-Junos certification. Don’t forget you can obtain 50% off the exam cost by passing the pre-assessment exam on Juniper’s website.

Juniper JNCIA-Junos - Routing Policy and Firewall Filters

We assume you have read chapter 2 of Juniper’s second PDF so that you can practice routing policy and firewall filters. First we are going to start with a simple route redistribution followed by a firewall filter to restrict telnet access.

Exercise 1 – Default route redistribution into OSPF

Create a policy to redistribute the existing default route (0.0.0.0/0) on JunOS1 into OSPF so that other routers can use it.

Solution

[edit]
root@JUNOS1# edit policy-options
[edit policy-options]
root@JUNOS1# set policy-statement default-static term accept-default-static from protocol static
[edit policy-options]
root@JUNOS1# set policy-statement default-static term accept-default-static from route-filter 0.0.0.0/0 exact
[edit policy-options]
root@JUNOS1# set policy-statement default-static term accept-default-static then accept
[edit policy-options]
root@JUNOS1# show
policy-statement default-static {
term accept-default-static {
from {
protocol static;
route-filter 0.0.0.0/0 exact;
}
then accept;
}
}
[edit policy-options]
root@JUNOS1# top edit protocols ospf
[edit protocols ospf]
root@JUNOS1# set export default-static
[edit]
root@JUNOS1# commit
JUNOS1 advertises the default route in OSPF, check that JUNOS3 can actually see it.
root@JUNOS3# run show route protocol ospf
inet.0: 15 destinations, 15 routes (15 active, 0 holddown, 0 hidden)
+ = Active Route, - = Last Active, * = Both
0.0.0.0/0          *[OSPF/150] 00:00:05, metric 0, tag 0
> to 172.30.25.9 via em4.0

Exercise 2 – Firewall filtering

To complete this exercise, we have to activate telnet service on JUNOS1.
[edit]
root@JUNOS1# set system services telnet
[edit]
root@JUNOS1# set system login user junuser class super-user authentication plain-text-password
[edit]
root@JUNOS1# commit
commit complete
Test the service from JUNOS3 using the loopback0 as the source interface.
[edit]
root@JUNOS3# run telnet 10.1.1.1 interface lo0
Trying 10.1.1.1...
Connected to 10.1.1.1.
Escape character is '^]'.
JUNOS1 (ttyp0)
login: junuser
Password:
--- JUNOS 10.1R1.8 built 2010-02-12 17:15:05 UTC

junuser@JUNOS1> exit
Connection closed by foreign host.
Now add a firewall filter to allow telnet access to JUNOS3 loopback0 interface (10.3.3.3) only. You have to define the firewall filter, a prefix list and apply the filter on JUNOS1′s loopback0.

Solution

[edit]
root@JUNOS1# edit firewall filter limit-telnet-access
[edit firewall filter limit-telnet-access]
root@JUNOS1# set term telnet-accept from source-prefix-list trusted
[edit firewall filter limit-telnet-access]
root@JUNOS1# set term telnet-accept from protocol tcp
[edit firewall filter limit-telnet-access]
root@JUNOS1# set term telnet-accept from destination-port telnet
[edit firewall filter limit-telnet-access]
root@JUNOS1# set term telnet-accept then accept
[edit firewall filter limit-telnet-access]
root@JUNOS1# set term telnet-reject from protocol tcp
[edit firewall filter limit-telnet-access]
root@JUNOS1# set term telnet-reject from destination-port telnet
[edit firewall filter limit-telnet-access]
root@JUNOS1# set term telnet-reject then discard
[edit firewall filter limit-telnet-access]
root@JUNOS1# set term telnet-reject then log
[edit firewall filter limit-telnet-access]
root@JUNOS1# set term else-accept then accept
[edit firewall filter limit-telnet-access]
root@JUNOS1# show
term telnet-accept {
from {
source-prefix-list {
trusted; ## 'trusted' is not defined
}
protocol tcp;
destination-port telnet;
}
then accept;
}
term telnet-reject {
from {
protocol tcp;
destination-port telnet;
}
then {
discard;
}
}
term else-accept {
then accept;
}
[edit firewall filter limit-telnet-access]
root@JUNOS1# top edit policy-options
[edit policy-options]
root@JUNOS1# set prefix-list trusted 10.3.3.3
[edit policy-options]
root@JUNOS1# top set interfaces lo0 unit 0 family inet filter input limit-telnet-access
Let check we can only connect only from JUNOS3′s loopback0 interface. Also have a look at the firewall log on JUNOS1.
root@JUNOS2# run telnet 10.1.1.1 interface lo0
Trying 10.1.1.1...
^C
[edit]
root@JUNOS3# run telnet 10.1.1.1 interface lo0
Trying 10.1.1.1...
Connected to 10.1.1.1.
Escape character is '^]'.
JUNOS1 (ttyp0)
login:
root@JUNOS1# run show firewall log
Log :
Time      Filter    Action Interface     Protocol        Src Addr                         Dest Addr
01:42:37  limit-telnet-access D em1.0    TCP             10.2.2.2                         10.1.1.1
01:42:33  limit-telnet-access D em1.0    TCP             10.2.2.2                         10.1.1.1
01:42:29  limit-telnet-access D em1.0    TCP             10.2.2.2                         10.1.1.1
01:42:25  limit-telnet-access D em1.0    TCP             10.2.2.2                         10.1.1.1

Juniper JNCIA-Junos - Routing Fundamentals

Starting with Juniper’s second PDF, we can make a new practice lab for the next 3 chapters. This lab is a bit more advanced than the previous one in order to test the OSPF routing protocol. You will need 3 Juniper routers, here are the connections:
  • JUNOS1, interface em0 <-> JUNOS2, interface em0
  • JUNOS1, interface em1 <-> JUNOS2, interface em1
  • JUNOS1, interface em4 <-> JUNOS3, interface em4
  • JUNOS2, interface em3 <-> JUNOS3, interface em3
Make sure the routers have a factory default configuration (use the load factory-default command if you need to). Then set the host-name, root password and IP addresses for each router, to save time you can copy and paste the following commands (don’t forget to commit):

JUNOS1

set system host-name JUNOS1
set interfaces em0 unit 0 family inet address 172.30.25.2/30
set interfaces em1 unit 0 family inet address 172.30.25.6/30
set interfaces em3 unit 0 family inet address 192.168.1.1/24
set interfaces em4 unit 0 family inet address 172.30.25.9/30
set interfaces lo0 unit 0 family inet address 10.1.1.1/24
set system root-authentication plain-text-password

JUNOS2

set system host-name JUNOS2
set interfaces em0 unit 0 family inet address 172.30.25.1/30
set interfaces em1 unit 0 family inet address 172.30.25.5/30
set interfaces em3 unit 0 family inet address 172.30.25.13/30
set interfaces lo0 unit 0 family inet address 10.2.2.2/24
set system root-authentication plain-text-password

JUNOS3

set system host-name JUNOS3
set interfaces lo0 unit 0 family inet address 10.3.3.3/24
set interfaces em3 unit 0 family inet address 172.30.25.14/30
set interfaces em4 unit 0 family inet address 172.30.25.10/30
set system root-authentication plain-text-password
If everything went fine, the topology for your new lab should be like in the following image. Please read chapter one of Juniper’s second PDF before continuing.

Exercise 1 – Static routing

On JUNOS1, configure a default static route (0.0.0.0/0) to next-hop 172.30.25.1.

Solution

Add a second default static route with a preference of 7 to next-hop 172.30.25.5 that should be used as a backup (floating static route) and commit.

Solution

Let’s check that everything is working as expected:
root@JUNOS1# run show route
inet.0: 5 destinations, 5 routes (5 active, 0 holddown, 0 hidden)
+ = Active Route, - = Last Active, * = Both

0.0.0.0/0          *[Static/5] 00:01:54
> to 172.30.25.1 via em0.0
[Static/7] 00:00:13
> to 172.30.25.5 via em1.0
...
[edit]
root@JUNOS1# run ping 10.2.2.2
PING 10.2.2.2 (10.2.2.2): 56 data bytes
64 bytes from 10.2.2.2: icmp_seq=0 ttl=64 time=1.650 ms
64 bytes from 10.2.2.2: icmp_seq=1 ttl=64 time=1.272 ms
root@JUNOS2# run monitor traffic interface em0
...
19:33:03.526742 172.30.25.2 > 10.2.2.2: ICMP echo request, id 16648, seq 0, length 64
[edit]
root@JUNOS1# deactivate interfaces em0
[edit]
root@JUNOS1# commit
commit complete
[edit]
root@JUNOS1# run ping 10.2.2.2
PING 10.2.2.2 (10.2.2.2): 56 data bytes
64 bytes from 10.2.2.2: icmp_seq=0 ttl=64 time=3.247 ms
64 bytes from 10.2.2.2: icmp_seq=1 ttl=64 time=0.658 ms
[edit]
root@JUNOS2# run monitor traffic interface em1
...
19:35:30.376370 172.30.25.6 > 10.2.2.2: ICMP echo request, id 14090, seq 7, length 64

Exercise 2 – OSPF routing

Configure OSPF routing on all interfaces connecting routers and their loopbacks but no adjacency should be formed on interfaces connecting to the 172.30.25.0/30 subnet (172.30.25.1 and 172.30.25.2).

Solution

JUNOS1

set protocols ospf area 0.0.0.0 interface em0.0 passive
set protocols ospf area 0.0.0.0 interface em1.0
set protocols ospf area 0.0.0.0 interface lo0.0
set protocols ospf area 0.0.0.0 interface em3.0
set protocols ospf area 0.0.0.0 interface em4.0

JUNOS2

set protocols ospf area 0.0.0.0 interface em0.0 passive
set protocols ospf area 0.0.0.0 interface em1.0
set protocols ospf area 0.0.0.0 interface lo0.0
set protocols ospf area 0.0.0.0 interface em3.0

JUNOS3

set protocols ospf area 0.0.0.0 interface em3.0
set protocols ospf area 0.0.0.0 interface em4.0
set protocols ospf area 0.0.0.0 interface lo0.0
Let’s check that everything is working as expected:
[edit]
root@JUNOS1# run show ospf neighbor
Address          Interface              State     ID               Pri  Dead
172.30.25.5      em1.0                  Full      10.2.2.2         128    34
172.30.25.10     em4.0                  Full      10.3.3.3         128    32
[edit]
root@JUNOS2# run show ospf neighbor
Address          Interface              State     ID               Pri  Dead
172.30.25.6      em1.0                  Full      10.1.1.1         128    36
172.30.25.14     em3.0                  Full      10.3.3.3         128    38
[edit]
root@JUNOS3# run show ospf neighbor
Address          Interface              State     ID               Pri  Dead
172.30.25.13     em3.0                  Full      10.2.2.2         128    36
172.30.25.9      em4.0                  Full      10.1.1.1         128    35
root@JUNOS3# run show route protocol ospf
...
10.1.1.1/32        *[OSPF/10] 00:04:11, metric 1
...
10.2.2.2/32        *[OSPF/10] 00:04:11, metric 1
...
192.168.1.0/24     *[OSPF/10] 00:00:02, metric 2
> to 172.30.25.9 via em4.0
root@JUNOS3# run traceroute 192.168.1.1
traceroute to 192.168.1.1 (192.168.1.1), 30 hops max, 40 byte packets
1  192.168.1.1 (192.168.1.1)  1.611 ms  0.588 ms  1.362 ms
[edit]
root@JUNOS3# deactivate interfaces em4
[edit]
root@JUNOS3# commit
commit complete
[edit]
root@JUNOS3# run traceroute 192.168.1.1

traceroute to 192.168.1.1 (192.168.1.1), 30 hops max, 40 byte packets
1  172.30.25.13 (172.30.25.13)  2.316 ms  1.479 ms  0.882 ms
2  192.168.1.1 (192.168.1.1)  1.283 ms  1.300 ms  1.129 ms
Finally, don’t forget to reactivate interface em4 and commit:
[edit]
root@JUNOS3# activate interfaces em4

[edit]
root@JUNOS3# commit
commit complete

Juniper JNCIA-Junos - Operational Monitoring and Maintenance

For the last chapter of Juniper’s first PDF, we are going to have a closer look how to get more information about JunOS and also practice the password recovery procedure that will sooner and later be useful for you.

Exercise 1 – boot messages

Do you remember the booting process in chapter 1? Well you have a command to see the messages again (hint: use the show system command).

Solution

root@JUNOS1# run show system boot-messages
Copyright (c) 1996-2010, Juniper Networks, Inc.
...
ad1: 1024MB <QEMU HARDDISK 0.11.0> at ata0-slave WDMA2
Trying to mount root from ufs:/dev/ad0s1a
vn_read_compressed_block: invalid block index 550

Exercise 2 – JunOS packages

Still about the booting process, we have seen that JunOS packages are loaded on virtual memory disks (you can still see that using the show system storage command). Find the command which list all these packages including their versions.

Solution

root@JUNOS1> show version
Hostname: JUNOS1
Model: olive
JUNOS Base OS boot [10.1R1.8]
JUNOS Base OS Software Suite [10.1R1.8]
JUNOS AppId Services [10.1R1.8]
JUNOS IDP Services [10.1R1.8]
JUNOS Routing Software Suite [10.1R1.8]

Exercise 3 – network interfaces

Now show all interfaces configured on JUNOS1 (equivalent to show ip interface brief on Cisco IOS) and then use a command to show a maximum of details for interface em0.

Solution

root@JUNOS1> show interfaces terse
Interface               Admin Link Proto    Local                 Remote
em0                     up    up
em0.0                   up    up   inet     192.168.1.1/24
192.168.1.3/24
...
root@JUNOS1> show interfaces em0 extensive
Physical interface: em0, Enabled, Physical link is Up
Interface index: 8, SNMP ifIndex: 17, Generation: 134
Type: Ethernet, Link-level type: Ethernet, MTU: 1514, Clocking:
...

Exercise 4 – monitor

Let’s play a bit more with the monitor command. On JUNOS2, monitor all interface traffic (statistics) in real time. From JUNOS1 ping JUNOS2 (192.168.1.2) and check the counters incrementing.

Solution

root@JUNOS2> monitor interface traffic
Interface    Link  Input packets        (pps)     Output packets        (pps)
...
em0           Up           1476                            1302
...

Exercise 5 – password recovery

Now assume you have forgotten the root password for JUNOS2 or maybe you really have, don’t panic, you are going to do a password recovery. First reboot you system and be ready to hit space to get to the kernel command prompt. Then follow the procedure as explained in the documentation.
root@JUNOS2> request system reboot
Reboot the system ? [yes,no] (no) yes
...

Solution

Hit [Enter] to boot immediately, or space bar for command prompt.
<space>
Type '?' for a list of commands, 'help' for more detailed help.
OK boot –s
...
Enter full pathname of shell or 'recovery' for root password recovery or RETURN for /bin/sh: recovery
...
NOTE: Once in the CLI, you will need to enter configuration mode using
NOTE: the 'configure' command to make any required changes. For example,
NOTE: to reset the root password, type:
NOTE:    configure
NOTE:    set system root-authentication plain-text-password
NOTE:    (enter the new password when asked)
NOTE:    commit
NOTE:    exit
NOTE:    exit
NOTE: When you exit the CLI, you will be asked if you want to reboot
NOTE: the system
Starting CLI ...
root> configure
Entering configuration mode
[edit]
root# set system root-authentication plain-text-password
New password:
Retype new password:
[edit]
root# commit
error: could not open database: /var/run/db/juniper.data: No such file or directory
error: Database open failed for file '/var/run/db/juniper.data': No such file or directory
commit complete
[edit]
root@JUNOS2# exit
Exiting configuration mode
root@JUNOS2> exit
Reboot the system? [y/n] y
Well done, you completed all exercises for Juniper’s first PDF, now it is time to go into more serious stuff with the second PDF and Routing Fundamentals

Juniper JNCIA-Junos - Secondary System Configuration

Before diving deeper into JunOS configuration you should have read chapter 4 of Juniper’s first PDF. Let’s continue with the same lab as before.

Exercise 1 – Syslog

On JUNOS2, set up a syslog file to record any config changes (hint: system syslog). Commit and quit.

Solution

[edit]
root@JUNOS2# set system syslog file config-changes change-log info
[edit]
root@JUNOS2# commit and-quit
commit complete
Exiting configuration mode
Now go back to configuration mode and change junuser to give operator permissions instead of super-user. Again, commit and-quit. Using the show command, display the log related to your previous commit.

Solution

[edit]
root@JUNOS2# set system login user junuser class operator
[edit]
root@JUNOS2# commit and-quit
commit complete
Exiting configuration mode
root@JUNOS2> show log config-changes
Dec 16 05:06:24  JUNOS2 mgd[1392]: UI_CFG_AUDIT_SET: User 'root' set:
[system login user junuser class] "super-user -> "operator"
Use the help syslog command to learn more about the message code (UI_CFG_AUDIT_SET).

Solution

root@JUNOS2> help syslog UI_CFG_AUDIT_SET
Name:          UI_CFG_AUDIT_SET
Message:       User '<username>' <action>: <pathname> <delimiter><data> ->
"<value>"
Help:          Value has been set for configuration object
Description:   The indicated user set a value for a configuration object, as
indicated.
Type:          Event: This message reports an event, not an error
Severity:      info
From JUNOS1, telnet to JUNOS2 (192.168.1.2), log in and start monitoring the change-log file in real time.

Solution

root@JUNOS1> telnet 192.168.1.2
Trying 192.168.1.2...
Connected to 192.168.1.2.
Escape character is '^]'.
JUNOS2 (ttyp0)
login: junuser
Password:
--- JUNOS 10.1R1.8 built 2010-02-12 17:15:05 UTC
junuser@JUNOS2> monitor start config-changes
Using the console (logged with root) on JUNOS2, delete em1 configuration and cancel your current candidate configuration using the rollback command. The operator connected via telnet should have been informed of what just happened. Stop all monitoring and exit.

Solution

[edit]
root@JUNOS2# delete interfaces em1
[edit]
root@JUNOS2# rollback 0
load complete
junuser@JUNOS2>
*** config-changes ***
Dec 16 05:16:53  JUNOS2 mgd[1392]: UI_CFG_AUDIT_OTHER: User 'root' delete: [interfaces em1]
Dec 16 05:17:12  JUNOS2 mgd[1392]: UI_CFG_AUDIT_OTHER: User 'root' rollback: /config/juniper.conf
...
junuser@JUNOS2> monitor list
monitor start "config-changes" (Last changed Dec 16 05:17:13)
junuser@JUNOS2> monitor stop
junuser@JUNOS2> exit

Exercise 2 – FTP and automated configuration backup

On JUNOS2, activate FTP and commit (hint: use set system services).

Solution

[edit]
root@JUNOS2# set system services ftp
[edit]
root@JUNOS2# commit
commit complete
Back to JUNOS1, configure it to backup any new configuration that becomes active on JUNOS2 (192.168.1.2) using FTP to ftp://junuser@192.168.1.2 (hint: configuration is done in system archival configuration level). Commit once to apply your candidate configuration, delete interface em3 and commit again. After a few seconds your new configuration should be backed up on JUNOS2 (use the file list /var/home/junuser command to check).

Solution

[edit]
root@JUNOS1# edit system archival configuration
[edit system archival configuration]
root@JUNOS1# set transfer-on-commit
root@JUNOS1# set archive-sites ftp://junuser@192.168.1.2 password mypassword
[edit system archival configuration]
root@JUNOS1# commit
commit complete
[edit system archival configuration]
root@JUNOS1# top delete interfaces em3
[edit system archival configuration]
root@JUNOS1# commit
commit complete
[edit]
root@JUNOS1# run show log messages | match juniper.conf
Dec 16 07:06:20  JUNOS1 logger: transfer-file: Transferred
/var/transfer/config/JUNOS1_juniper.conf.gz_20111216_070529
root@JUNOS2> file list /var/home/junuser
/var/home/junuser:
.ssh/
JUNOS1_juniper.conf.gz_20111216_070459

Wednesday, 20 February 2013

Juniper JNCIA-Junos - User Interface Options & Initial Configuration


This page is to practice what you learned in Juniper’s PDF (part 1), chapter 2 and 3.  So now it is time to get active and log in as root without any password.
First thing you should notice is that Amnesiac is the default host-name. This indicates that our JunOS is running with the factory-default configuration (you can use the load factory-default command in configuration mode to have a JunOS in this state).
You are logged in as root, you should see the UNIX shell prompt root@% where you can type UNIX commands like ls or ps but this is beyond our scope. What we want is the operational mode prompt root> that is started with the cli command.
Amnesiac (ttyd0)
login: root
--- JUNOS 10.1R1.8 built 2010-02-12 17:15:05 UTC
root@% cli
root>
Type show configuration to display the current factory-default configuration.
root> show configuration
## Last commit: 2011-02-17 00:34:21 UTC by root
version 10.1R1.8;
system {
    syslog {
        user * {
            any emergency;
        }
        file messages {
            any notice;
            authorization info;
        }
        file interactive-commands {
            interactive-commands any;
        }
    }
    ## Warning: missing mandatory statement(s): 'root-authentication'
}
Note the missing mandatory statement warning, this means you will not be able to commit your changes until you set up a password for root.

Exercise 1 – root password

Go to configuration mode using the configure command and try to commit the current candidate configuration, then set a password for root and commit again.

Solution

Now your JunOS route is ready for new commits! Let’s see if you can apply the same configuration on your second router without looking at the solution above. Remember, you must first login, then go to operational mode and then to configuration mode. The command to set up the root password starts with set system, use ? to find the complete command. Finally, don’t forget to commit or your configuration will not be active!
root# set system ?
Possible completions:
> accounting           System accounting configuration
+ apply-groups         Groups from which to inherit configuration data
...
> tracing              System wide option for remote tracing
Also try out the help topic command to display usage guidelines (if you want the all story), the help reference command to display summary information (the most useful when you want to know about all command options) and the help apropos command which displays the contexts (typically set commands) relevant to the configuration hierarchy level at which you are currently positioned (if you want help only for your current hierarchy level and nothing else).
[edit]
root# help topic system root-authentication
root# help reference system root-authentication
root# help apropos root-authentication

Exercise 2 – host-name

Have you noticed? We have exactly the same prompt on both routers; this is annoying as we want to know which is which. Let’s add a host-name for both routers. We’ll let you find the right command (hint: use set system ?)

Solution

Now compare the candidate configuration with the active configuration using show | compare. The + are lines that are going to be added to the active configuration when you commit and – lines are going to be removed.  This is very useful to know exactly what is about to be changed. Do it on both routers and commit.
root# show | compare
[edit system]
+  host-name JUNOS1;
[edit]
root# commit
commit complete

Exercise 3 – rollback

On JUNOS2, configure a wrong hostname, anything. Commit your configuration and rollback to the one containing the right hostname.

Solution

Exercise 4 – edit

Let’s configure an IP address for the first interface on our JUNOS1 router using the edit command. Place yourself at the following level:interfaces em0 unit 0 family inet. em0 is the name for our first interface, give it this IP address and mask: 192.168.1.1/24

Solution

Exercise 5 – up

Go back up 3 levels and edit em1 in the same way as em0. Configure the following IP address and mask: 10.1.1.1/8

Solution

Exercise 6 – top & commit check

Go to the top level, check your configuration and commit.

Solution

Exercise 7 – set vs. edit & set

Configure the em0 (logical unit 0, IPv4 family) interface on JUNOS2 router with 192.168.1.2/24 IP address using the set command from the top level (remember ? is your friend).

Solution

Configure IP address 10.1.1.2/8 on em1 by placing yourself to the last level using edit.

Solution

Exercise 8 – telnet

Now we would like to configure telnet (SSH would be a better choice as it is secured) to remotely configure JUNOS2 from JUNOS1. First check that nothing is configured under system services level while staying at your current level (hint: use top). Then edit that level without going back to the top level. Configure telnet with the set command, exit to the top level, check what you are about to change and finally commit.

Solution

Add a user account to access this device using telnet and commit again.

Solution

Exercise 9 – run

Back to JUNOS1, without leaving configuration mode, ping and telnet to JUNOS2 (IP address: 192.168.1.2). Use Ctrl + C to stop pinging. Use the username and password you previously created to authenticate with JUNOS2.

Solution

Exercise 10 – automatic rollback

From your telnet session on JUNOS2, delete the telnet statement under system services level and commit in a way that if you lose your connection to JUNOS2, the configuration is automatically rolled back after 1 minute. Exit both configuration and operational modes to go back to JUNOS1. Try to telnet again to 192.168.1.2; this should not work. Wait about 2 minutes (take a coffee break) and try again. This time it should work as your previous commit should have been rolled back.

Solution

Exercise 11 – copy & rename

Copy em1 configuration to em2 and rename em2 to em3. Deactivate em3. Go to interfaces level and display the candidate configuration. Note the inactive: em3. Finally commit.

Solution

Change em3 IP address from 10.1.1.1/8 to 10.1.1.3/8 (hint: use the rename command). Maybe you would like to see what commands produced this candidate configuration? Use show and a pipe to find out.

Solution

Exercise 12 – annotate

Add an annotation saying that em3 is inactive. Using only one command, commit with a comment describing what you just did and return to operational mode.

Solution

Compare the active configuration with the previous one using the show configuration command.

Solution

Exercise 13 – rescue

You know your configuration works well (basic connectivity is established for instance). Therefore you want to make it the rescue configuration in case of problem; this will speed up a recovery. Create the rescue configuration and restore it.

Solution

Exercise 14 – preferred IP address

Configure an additional IP address (192.168.1.3/24) for em0 and configure your router so that it uses this IP as the source when sending pings to JUNOS2. Commit, exit to operational mode and check with the show interfaces command that em0 has 2 IP addresses.

Solution

Let’s check that JUNOS1 can actually send packets using source IP address 192.168.1.3. On JUNOS2, in operational mode, use the following command to monitor the traffic to and from the router:  monitor traffic interface em0 (Ctrl + C to exit). Then ping from JUNOS1 to 192.168.1.2. You should see that you are receiving packets from 192.168.1.3 (192.168.1.3 > 192.168.1.2)
root@JUNOS1> ping 192.168.1.2
PING 192.168.1.2 (192.168.1.2): 56 data bytes
64 bytes from 192.168.1.2: icmp_seq=0 ttl=64 time=12.510 ms
64 bytes from 192.168.1.2: icmp_seq=1 ttl=64 time=1.665 ms
root@JUNOS2> monitor traffic interface em0
verbose output suppressed, use <detail> or <extensive> for full protocol decode
Address resolution is ON. Use <no-resolve> to avoid any reverse lookup delay.
Address resolution timeout is 4s.
Listening on em0, capture size 96 bytes
04:37:18.543830 192.168.1.3 > 192.168.1.2: ICMP echo request, id 40718, seq 12, length 64
04:37:18.544023 192.168.1.2 > 192.168.1.3: ICMP echo reply, id 40718, seq 12, length 64
Congratulations, you completed this page! If you are ready to have some more, please go to Secondary System Configuration